这是一个创建于 1120 天前的主题,其中的信息可能已经有所发展或是发生改变。
概要
用户服务基本是每个互联网产品里必备的一个服务了,因为没有用户基本是什么也干不了。所以他的重要性不言而喻。本文主要介绍下如何开发一个用户微服务,以及他的详细开发流程。
目录
- Go 微服务实战 - 从 0 到 1 搭建一个类 Instagram 应用(持续更新)
- Go 微服务实战 - 用户服务(gRPC+Protocol Buffer)
- Go 微服务实战 - 关系服务服务(gRPC+Protocol Buffer)
- Go 微服务实战 - 动态服务(gRPC+Protocol Buffer)
- Go 微服务实战 - 聚合服务( http)
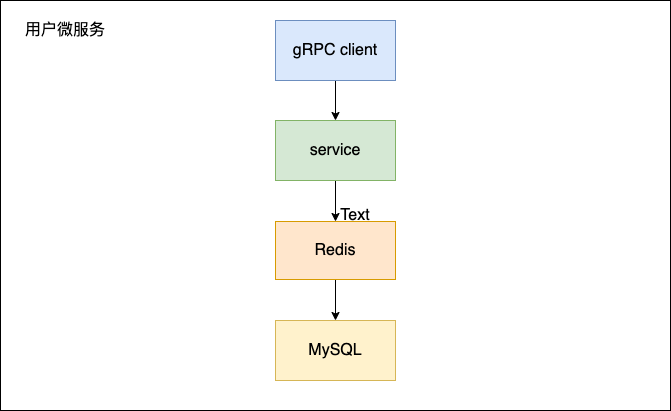
调用流程图

技术栈
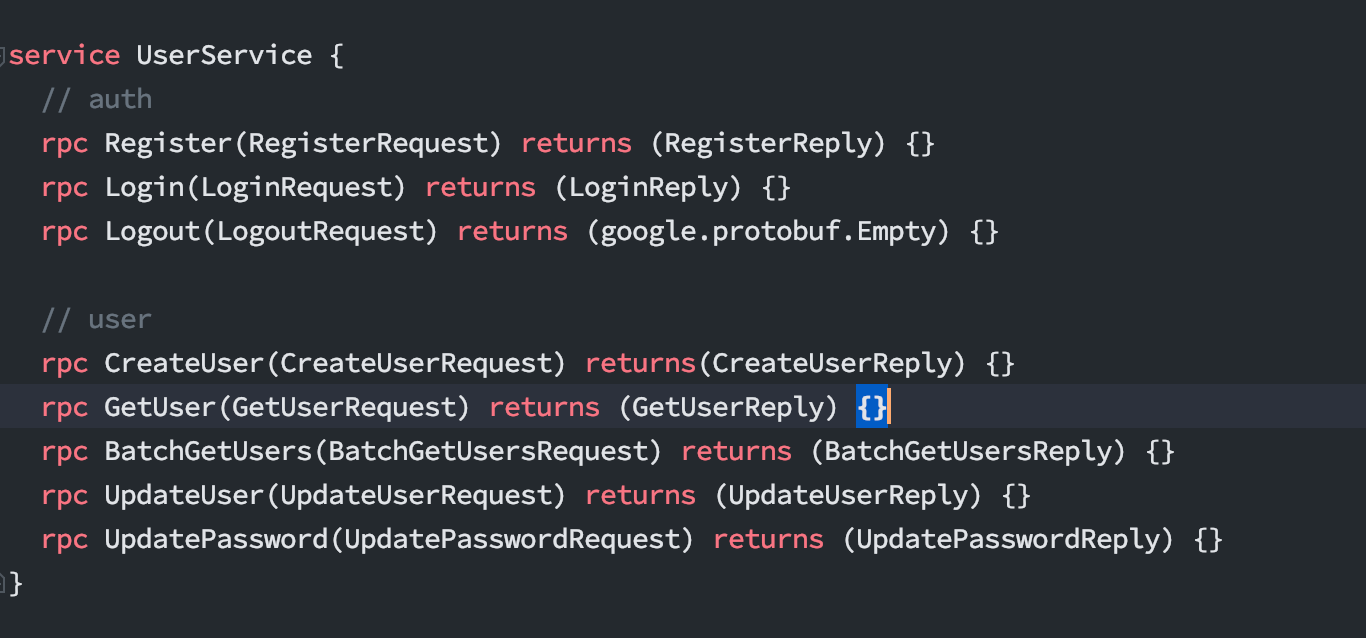
接口开发
使用 proto 方式定义,主要包含以下接口

开发步骤
这里详细的记录了开发的步骤,方便参看本项目的同学知道其实现过程。
1 、生成 proto 模板文件
eagle proto add api/user/v1/user.proto 内容如下
syntax = "proto3"; package api.user.v1; option go_package = "github.com/go-microservice/user-service/api/user/v1;v1"; option java_multiple_files = true; option java_package = "api.user.v1"; service UserService { rpc CreateUser (CreateUserRequest) returns (CreateUserReply); rpc UpdateUser (UpdateUserRequest) returns (UpdateUserReply); rpc DeleteUser (DeleteUserRequest) returns (DeleteUserReply); rpc GetUser (GetUserRequest) returns (GetUserReply); rpc ListUser (ListUser1Request) returns (ListUserReply); } message CreateUser1Request {} message CreateUser1Reply {} message UpdateUserRequest {} message UpdateUserReply {} message DeleteUserRequest {} message DeleteUserReply {} message GetUserRequest {} message GetUserReply {} message ListUserRequest {} message ListUserReply {} 2 、为 proto 填充业务方法及字段定义
vim api/user/v1/user.proto 3 、生成 pb 文件
会生成两个文件 api/user/v1/user.pb.go 和 api/user/v1/user.pb.go
# 生成所有 proto make grpc # 或者 # 生成指定 proto 的 pb 文件 eagle proto client api/user/v1/user.proto # Output ll api/like/v1/ like.pb.go #新增 like.proto like_grpc.pb.go #新增 4 、生成 server 骨架代码
# 生成骨架代码 eagle proto server api/like/v1/like.proto # 默认会输出到 internal/service # 如果需要指定到对应的目录,可以使用 -t 参数, eg: # eagle proto server -t internal/logic # 查看 internal/service/likeservice_grpc.go 5 、注册服务到 gRPC Server
// internal/server/grpc.go import ( ... v1 "github.com/go-microservice/user-service/api/user/v1" ... ) ... // NewGRPCServer creates a gRPC server func NewGRPCServer( cfg *app.ServerConfig, // 新增 svc *service.UserServiceServer, ) *grpc.Server { grpcServer := grpc.NewServer( grpc.Network("tcp"), grpc.Address(cfg.WriteTimeout), grpc.Timeout(cfg.WriteTimeout), ) // register biz service // 新增 v1.RegisterUserServiceServer(grpcServer, svc) return grpcServer } 6 、在生成的 server 中编写业务逻辑
// vim internal/service/userservice_grpc.go package service import ( "context" pb "github.com/go-microservice/moment-service/api/user/v1" ) var ( _ pb.UserServiceServer = (*UserServiceServer)(nil) ) type UserServiceServer struct { pb.UnimplementedUserServiceServer } func NewUserServiceServer() *UserServiceServer { return &UserServiceServer{ } } func (s *UserServiceServer) CreateUser(ctx context.Context, req *pb.CreateUserRequest) (*pb.CreateUserReply, error) { return &pb.CreateUserReply{}, nil } func (s *UserServiceServer) UpdateUser(ctx context.Context, req *pb.UpdateUserRequest) (*pb.UpdateUserReply, error) { return &pb.UpdateUserReply{}, nil } func (s *UserServiceServer) DeleteUser(ctx context.Context, req *pb.DeleteUserRequest) (*pb.DeleteUserReply, error) { return &pb.DeleteUserReply{}, nil } func (s *UserServiceServer) GetUser(ctx context.Context, req *pb.GetUserRequest) (*pb.GetUserReply, error) { return &pb.GetUserReply{}, nil } func (s *UserServiceServer) ListUser(ctx context.Context, req *pb.ListUserRequest) (*pb.ListUserReply, error) { return &pb.ListUserReply{}, nil } 7 、启动服务
# 在根目录下运行 go run main.go 确保运行 gRPC server
// main.go ... eagle.WithServer( // init gRPC server gs, ), ... 8 、接口调试
调试工具,这里使用 [grpcurl]( https://github.com/fullstorydev/grpcurl)
# 查看服务列表 grpcurl -plaintext localhost:9090 list # Output api.user.v1.UserService grpc.health.v1.Health grpc.reflection.v1alpha.ServerReflection # 访问列表 grpcurl -plaintext -d '{"user_id":2}' localhost:9090 api.user.v1.UserService/ListUser 参数说明
- -d 提交的参数,json 格式
- -plaintext 使用纯文本连接,跳过 TLS
也可以使用以下工具进行本地测试
-
postman: 新版本的 postman 也支持 gRPC(beta 版)调试
-
grpucui: https://github.com/fullstorydev/grpcui
# 开启 UI 界面调试窗口 grpcui -plaintext localhost:9090
部署
两种部署方式
- docker
- k8s (本地部署可以使用 minikube)
部署步骤
-
构建 docker 镜像
docker build -t user-service:v1.0.0 -f deploy/docker/Dockerfile . -
打 docker tag
docker tag user-service:v1.0.0 qloog/user-service:v1.0.0 -
push tag 到 docker hub
docker push qloog/user-service:v1.0.0 -
部署到 k8s
kubectl apply -f deploy/k8s/go-deployment.yaml kubectl apply -f deploy/k8s/go-service.yaml
以上命令都是一步一步执行的,为了方便期间,这里也提供了一件部署脚本,执行如下
sh deploy/deploy.sh 项目源码
最终源码在这里:https://github.com/go-microservice/user-service
完结
到此,开发、测试、部署已经操作完了,后面会继续完善链路追踪和监控相关的部分。
感谢阅读, 祝大家 Happy coding~
目前尚无回复
